Sunday, April 28, 2013

Menu Plan: Spring (Apr. 28- May 4)


Strategies
  • All our meats this week are ones we already have stored in the freezer, and so our grocery trip only involved produce and dairy items. Our freezer stock is beginning to run low, and so we'll keep an eye out for sales to begin stocking up once again. Purchasing expensive grocery items like meat in large quantites when it's on sale is a great way to stay in budget. 
Breakfasts
Granola cereal, banana 
- Yogurt parfait (homemade yogurt + frozen mixed berries + homemade granola)

Lunches
- Salmon cakes, peas
- Beef stroganoff  (I just use ground beef)
Spinach & leek pie (thanks for the suggestion Dawn L.!) (We didn't get to this one last week)
- Southwest salad (greens, tomatoes, corn, cranberries, raisins, tortilla chip pieces with southwestern ranch dressing- I go easy on the hot components though)

Dinners
- Roast duck breast, mashed potatoes, glazed carrots (hubby's night to cook!)
- Duck stew, dandelion greens (hubby's other meal creation)
- Repeat beef stroganoff
- Greek salad pita sandwiches

Snacks
-celery with peanut butter
-fruit: oranges, bananas, apples, oranges,
-cheese slices
-yogurt & strawberries
- Amish friendship bread


*Note: Reviving Homemaking is not affiliated with any of the sites or companies included in the links, and was not asked to include or recommend them or their recipes in this post. (I simply like what they have to offer!)

Saturday, April 27, 2013

DIY Chair Cushion


Image Source: http://www.flickr.com/photos/reiner/331732019/


      Welcome to the fifth and final post of the "DIY Dining Room Decor" series! Over the course of this week I have been sharing five easy and budget-friendly projects to add to the organization, function and style of the dining room. We've now created a menu board to hang on the wall to maintain organization. We've also created a very cost effective tablecloth. For the top of that lovely tablecloth we've made a table centerpiece and some woven burlap placemats. (Scroll down to bottom of post for links to previous posts). Today's final project is a cushy for the tushy. (Hehehe) 

     I love the way that a meal shared with friends or family can linger as conversations continue well after the food is finished. My tush, on the contrary, is less than pleased with the extended time on hard chairs. Maybe it's the design of our chairs? Either way, today's post is all about adding function within the dining room with the creation of some DIY chair cushions. 


     Once again, I'm turning to one of my favorite resources for providing a large amount of material in a very cost effective manner- the $5 twin sheet. As much as I enjoy creative projects, I also enjoy saving money where I can. The pieces of foam ranged from $5.99-6.99 each depending on the craft store. I highly recommend collecting store coupons to purchase the foam pieces even if that means making multiple trips to the store (if you're already out and about in town, of course). I calculated the cost to be around $19.39 (if you get each foam piece with a coupon or on sale), which is about $4.85 per chair cushion for my set of four chairs. I fairly certain even the cheapest options in the stores are higher. Plus, since I'm using the same sheet I made the tablecloth with, I know that the two pieces will match. 

     Steps to make the chair cushion are included in the following photos. If you have trouble viewing the photos, then let me know and I can provide instructions with only the text. Have fun!


      And that's the end of the series. I had a lot of fun putting together each of these projects. (I also enjoyed the fact that each project was more cost-effective as a DIY endeavor than purchasing the pre-made version in a store!). I hope they have inspired you in ways to add those little decorative touches to your home as well. 

       This series wasn't just about the aesthetics of decoration, however. My goal was to also demonstrate that choosing to be a homemaking family on one-income doesn't mean you have to be limited to stark white walls and no extra decorative touches. There are means to accomplish the same goals without having to turn to pulling in a second income to do so. It's a matter of seeing potential beyond store displays and creatively using what you have available. Part of my definition of homemaking involves the home as a place of productivity. To create items for your home with your own hands is indeed fulfilling the function of productivity (versus consumerism). 

        Finally, no part of decorating whether created by you or purchase from a store will give meaning to the home. That must come from you personally. Meaning within a home comes from the people gathered, memories shared, and relationships built. The projects within the series are fun ways to add to the appearance of the home, but the heart is the greatest project of all. 

Previous Posts in Series:


Friday, April 26, 2013

DIY Woven Burlap Placemat

Image Source: http://www.flickr.com/photos/reiner/331732019/

      Welcome to the fourth post of the "DIY Dining Room Decor" series! Over the course of this week I have been sharing five easy and budget-friendly projects to add to the organization, function and style of the dining room. We've now created a menu board to hang on the wall to maintain organization. We've also created a very cost effective tablecloth. Yesterday, we added a touch of style with the creation of a simple centerpiece. (Scroll down to bottom of post for links to previous posts).Today, we're going to be making some fun placemats! 


     When I considered the feel I wanted the dining room space to convey, I thought of the words "natural," "earthy" and "calm." I feel like I achieved that with the use of lentils and split peas as the filler in the vases. I thought I'd continue on that path in making the placemats. I liked the natural texture and color of burlap. Instead of cutting a single sheet of the material, I decided to do a woven pattern. The weave will also strengthen it and provide extra durability. 

I purchased wide burlap ribbon from the floral section of the craft store (at 50% off! whoo hoo!). To make a placemat you will need: 7 strips of 14.5 inches long of ribbon, 5 strips of 19.25 inches long of ribbon, matching thread, scissors, and a sewing machine with a heavy needle. Each placemat will use approximately 16.5 ft. of ribbon.

Lay out all the long pieces horizontally. 

Begin to weave the shorter, vertical pieces. You will have some extra on the ends that will be cut off later. I allowed myself some extra length since it's always easier to cut length off than put it back on (aka waste material to cut a new one).

I found it helpful to pin the pieces together as I went so that they didn't shift during the next step. You will want to make sure they fit snugly against each other, but not so tight that they buckle. 

Next, sew 1/4-1/2 in. around the edge. 

Cut off excess ribbon round edges. 
(Note: burlap has a natural "aroma", and so it's a good idea to let it air out a bit outside. Afterwards, you're good to go with your new placemats!)

Finished product! 

         I'm really enjoying how all of these little projects are coming together! In terms of cost, each placemat was about $3 each, which is comparable to the cheapest option I found in the stores. However, I rather like my placemats better than the styles available at that price range (but I could have a crafter's bias. haha). If I ever need additional settings, then I can easily make extra placemats. One benefit to taking a DIY approach to home decor is never having to be concerned about a product being discontinued in a store. I can just make what I need! Tomorrow we'll finish up the series with some DIY chair cushions made from..you guess it, a (new) sheet. 


Previous Posts in Series:

Inspiration:

Thursday, April 25, 2013

DIY Table Centerpiece

Image Source: http://www.flickr.com/photos/reiner/331732019/

      Welcome to the third post of the "DIY Dining Room Decor" series! Over the course of this week I'll be sharing five easy and budget-friendly projects to add to the organization, function and style of the dining room. The last post we focused on organization with the creation of a menu board to hang in the dining room or kitchen wall. The second post provided a tutorial for creating your own tablecloth from a (new) sheet.Today we're still working with the table top by adding a DIY centerpiece. 

     I wanted something simple and natural as a centerpiece for my table. I didn't want anything too elaborate as removing and replacing it between meals would be less than desirable. I also wanted something that could be used all year, regardless of the season. Lastly, the project needed to be cost effective. I enjoy decorating my home, but I also enjoy saving money in the meanwhile. Thanks to Pinterest, I found some wonderful inspirations (see links at bottom of post). These particular centerpieces used dried foods and candles within vases. I love the use of food as part of decoration in the dining room or kitchen!

       The materials needed include: three vases of two different sizes, three candles of two different sizes, two bags of split peas and two bags of lentils. I looked every time we were at any store with clear vases for some that were in my price range. Eventually, I found some on clearance! The remaining supplies were purchased at regular price, but their cost was low. I really like the contrast of the green split peas against the dark gray tablecloth. I also liked the idea of the brown and green creating an earthy effect. For an extra touch, I could (and may do so later) add some twine or slim strip of burlap around the vases. I'm undecided about it and so, for now I'm going to leave them plain (simplicity was one of my goals anyways). 

       So, so far we've decorated the dining room with a menu board, tablecloth, and now table centerpiece. I hope you can see how decorating can be accomplished without a great deal of dependence on prefab store purchases or expense. Even the decorating aspect of homemaking can be a reality based on how it's approached. The next post in the series we will take a DIY approach yet again for some fun placemats for the table!. 

Previous Posts in Series:

Inspirations:

Wednesday, April 24, 2013

DIY Tablecloth


*Originally posted March 6, 2013. Adapted for inclusion in DIY Dining Room Decor series. 

Image Source: http://www.flickr.com/photos/reiner/331732019/

      Welcome to the second post of the "DIY Dining Room Decor" series! Over the course of this week I'll be sharing five easy and budget-friendly projects to add to the organization, function and style of the dining room. The last post we focused on organization with the creation of a menu board to hang in the dining room or kitchen wall. Today we're shifting the attention to the dining table.  

        I've had our dining room table since my first apartment in college (I was only 19!). This poor table has made numerous moves, and while it has structurally held up the table surface has experienced quite a few cracks, scratches, and gouges. Even if your table top is still in good shape, a lovely tablecloth adds a lot of character to a dining room. It's also fun to quickly and easily change up the look with a simple tablecloth swap. Ordinarily, having cloth or multiple tablecloths would be rather expensive. However, you can actually create your own tablecloths from a (new) sheet for as low as $5 (depending on the size of your table)! Our table is pretty small and only requires a twin sheet, which can be found pretty inexpensively. I'm certain that a cute tablecloth for only $5 would be hard to find in the stores!

         The skill level for sewing a tablecloth from a sheet is that of beginner. If you can sew a straight line, then you can do this project. While you might prefer the thinner and smoother sheets for bedding, you'll want those rough and tough sheets for making a tablecloth (which are cheaper too). 

        Below is a tutorial for making the tablecloth. If you would prefer printable versions of the tutorial then follow either link below.


Tutorial: How To Make a (52"x70") Tablecloth From a Sheet
1. Begin by washing and drying your material to account for any shrinking. Next, iron the material. 

2. Lay material out on a large flat surface. If you have an existing tablecloth, then you can lay it on top, and use it as a size guide. You will then measure one inch extra around all sides to allow for a 1/2'' hem.  If not using a guide, then measure out a rectangle that is 53'' x 71''.


3. Cut out measured amount.  

4. The edges will be finished with a 1/2'' hem. A beginner's tip is to use a fabric glue stick and disappearing ink pen to ensure all parts align properly. Using the disappearing ink pen, measure and draw a line 1'' and then a second line1/2'' from the first around all edges. This acts as a guide for folding the edges and making sure they are straight. The corner markings will also be helpful in creating the mitered corner. 


5. Fold edge of material to meet first line marking. The folded section will be about 1/2'' wide. Do the same for all four edges of the material. (It may be helpful to add some glue and then iron to keep it in place). 


6. Next, fold the tip of the corner corner piece to the innermost crossing of the line marks. Press the bottom edge of that fold with an iron to maintain marking of the edge. (I've demonstrated it with a dotted line in the photo below). 

7. Unfold the corner. Cut along this line. This will reduce bulk within the corner once sewn. 


8. Ever so slightly turn the raw edge of the cut corner under (towards wrong side of material) and secure by ironing it in place (may be helpful to add a dab of glue). 


9. Fold one edge of the tablecloth material so that the corner edge of the cut corner meets the innermost crossing of the marked lines. Do the same for the other side.  


The corner edges should meet and now look like this. 

10. Fold side edges again to meet innermost marked line. You should now have a 1/2'' hem and mitered corners all around the material. 


11. To finish, simply top stitch 1/4'' along the perimeter of the tablecloth. 


12. You will probably want to add a waterproofing to the material since spills are bound to happen at the dining table. Scotch Guard is a common product for waterproofing. You could also just lay a clear vinyl tablecloth over everything while eating. 


Finished!


One of the fun aspects of having a solid tablecloth is the potential to change up the look with various centerpieces and even cloth napkins. Textiles are fantastic for adding a lot of color and life to home decor while still being budget-friendly!

Tuesday, April 23, 2013

DIY Weekly Menu Board

Image Source: http://www.flickr.com/photos/reiner/331732019/

      Welcome to the first post of the "DIY Dining Room Decor" series! Over the course of this week I'll be sharing five easy and budget-friendly projects to add to the organization, function and style of the dining room. Today we're going to focus on one of my favorite aspects of decorating- organization!

      If you have been reading Reviving Homemaking even for a short period of time, then you will know that in our home we first prepare for weekly meals by menu planning. When we married and I began to figure out how to manage a home, I quickly decided that menu planning was a priority to learn. I could not tolerate coming home from a long day at college and/or work to be faced with the question of, "What should I make for dinner?" I would become so aggravated at needing to prepare a meal I didn't have the energy to do, didn't have all the ingredients I needed when I needed them (which prompted additional costly trips to the store), or gave up by going out to eat (which again, is very costly). The solution was menu planning. 

       For us, menu planning is all about knowing what we need to prepare meals and by when we needed it. I account for everything in our menu plans, including healthy and fresh snacks. I perhaps over plan, but I'd rather have good options available than to turn to junk foods or fast foods. There will be another post in the future on exactly how we've come to create our weekly menus, but for now I'm going to focus more on keeping those menus organized. 

       What's better than an area that is happily organized? Happy organization on display! In a previous post, I demonstrated how we were able to turn bookshelves into a pantry. Although functional as storage, the unit itself and organization of it also serves as a decorative element in our kitchen. Our menu board serves likewise purposes of function and decor. Once we have determined our menu for the week, I then find the matching card or write a new one if the recipe is new. Some weeks we flip back through the cards for ideas on what to plan. Easy!

         Creating the menu board is also very easy. It requires just a few simple supplies and steps.  

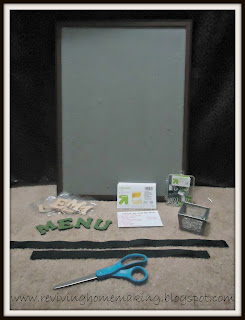
Supplies needed include: cork board (I re-purposed my jewelry board), ribbon, wooden letters, paint (for wooden letters & cork board), index cards, binder clips, push pins, letter stickers. 

1. Paint cork board desired color. If you wish, you could attack fabric to the board instead of painting it. Paint the wooden letters as well. 

2. Cut ribbon the width of the board. Cut a second piece of ribbon a few inches less than the length of the board. 

3. Attach ribbon to board (in a "T" position as pictured) using hot glue. Glue the shorter, horizontal ribbon completely. The long, vertical ribbon needs to be glued only at the top and bottom so that the clips will attach in the middle. Glue the letters to the board as well.

4. Determine 4-5 spots on the right side of the long ribbon for storing used cards. Be sure to space them apart enough so that they don't overlap. Above those marks, use the letter stickers to spell out the meal occasion (breakfasts, lunches, dinners, snacks). I have an extra spot at the bottom of mine that is unlabeled and is used for blank cards.

5. Cut the index cards in half. Use the binder clips to attach cards to at least seven places on the long ribbon (for each day of the week). Use other clips to keep used cards stored to the right. 
6. To use, just clip one card of each meal occasion to the appropriate place on the long ribbon. When done, then move them to the right and clip cards for the new week's meals to the long ribbon.   

       And that's it! Having a menu planning is a must for me. I can rearrange it as needed throughout the week, but some base from which to work is nice. Even nicer is the menu plan nicely organized and displayed on our dining room wall.


Related Posts Plugin for WordPress, Blogger...