Showing posts with label Homemaking. Show all posts

Wednesday, July 30, 2014

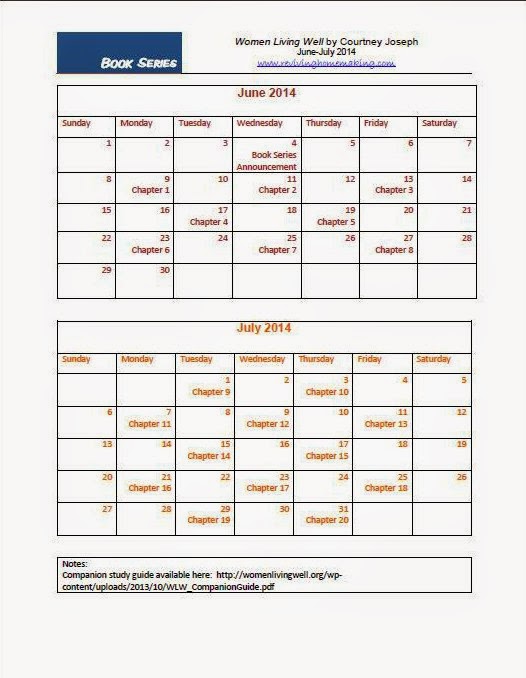
Book Series: Women Living Well - Chapter 19


Media and Your Homemaking -- Times Have Changed!

     Several years ago only a few homemaking blogs were available. Now, there are hundreds -hundreds of voices offering critiques and other opinions. At some point it all became noise and clutter to the revitalization of homemaking. I am one of them.

     Homemaking in the media has transformed into a highly competitive entity. Whose voice is louder? Whose numbers are greater? My possession of either of those qualities is unimpressive, and I often feel as though my voice is lost entirely. What is my voice anyways? I get the impression that I’m expected to instruct, advise or otherwise place myself in a position expertise. This is what I read in bloggers. Yet, this is not achievable for me as I am most always still learning lessons myself. My original intent for the Reviving Homemaking blog was to simply share what I was learning and experiencing on my journey of rediscovering homemaking.  Nonetheless, I repeatedly must step away to reconnect with this purpose. How quickly I become entangled in the web of homemaking blogging. Honestly, I don’t want to compete. I simply want to share.

     Sharing, though, is made difficult when the threat of unabashed criticism lurks. I write and rewrite spending hours on posts making sure each sentence is as acceptable as possible. The vast majority of the time the desired words never make it to the screen at all. I’m too consumed with the potential for criticism. Honestly, I struggle enough to hold my head up against nit-picking criticism offline, much less to expose myself further via online presence. It takes tough skin to be a blogger, especially with polarizing subject matter. The truth is my skin is so thin. The sting of words lingers. On one occasion, I learned that another blogger had taken my words from a post of mine and written a critiquing response on her blog. I took a break from blogging afterwards.

     There has been many times in which I've stepped away from the online realm of homemaking. With so much input on the subject, it becomes murky and messy. My ability to see my own homemaking path becomes less clear. Despite the intent of blogs to encourage, so often they leave me discouraged and needlessly burdened.


     In ways, homemaking in the media has had a negative impact on my homemaking journey. I turn it off in search for peace and purpose. In other ways, media has uplifted and revitalized homemaking. It’s made it accessible to all women. Women who are experienced in the practice are able to share insights and those who are novices are able to turn to this resource for learning. There is a positive and negative side to everything. There is also a balance to all things. I’ve learned that it is important to occasionally turn off the screen and step away in order to define and establish one’s own practice and purpose. 


*Note: Reviving Homemaking is not an affiliate of www.womenlivingwell.org or the publishing companies (Thomas Nelson & HarperCollins Christian Publishing). No compensation has been received by either of these entities for the review of the book. All opinions are my own. 

Friday, January 10, 2014

Proper Care for Cookware

Image used by permission per Creative Commons Attribution License. Copyright by "Dinner Series" (http://www.flickr.com/photos/dinnerseries/). Editing (overlay & text) by Reviving Homemaking. 
    
   We have three main types of cookware: nonstick, stainless steel and cast iron. Each require attentiveness to care to maintain optimum condition and lifespan. Knowledge of this care my be common-sense, or it may be more of a matter of domestic education. My experience has been of learning through a few mistakes. I've scrubbed cast iron until it no longer had any coating (yes, *cringe*). I've also tossed nonstick skillets in the dishwasher. The former incident required lots of reseasoning. The latter resulted in needing to replace the pans after only three years of use. I didn't know then what I know now about caring for my cookware! The following is a simple set of guidelines regarding maintaining my specific sets of cookware. Perhaps they will apply to yours as well. Of course, it is best to check with the particular manufacturer of your cookware as not all cookware is made the same. 

Nonstick
      There are some foods that cook best in a nonstick pan. I find that eggs, for instance, will cook the best without sticking in a nonstick pan. Crepes are also easier to make in a nonstick pan. However, if the food can be cooked in another type of pan then I prefer to skip nonstick cookware. My greatest aggravation with nonstick is that it has to be handled very carefully and then may not last the full lifespan of ten years. My last pans lasted only three years, which is a painfully short time frame considering the financial investment for quality pans. Granted, I did not know then that nonstick pans should never be placed in the dishwasher. Before long, the nonstick coating began to wear thin. Continuing to cook with pans which had a less than intact coating was not desirable. We received two new high quality pans for Christmas this year, and I'm now well-versed on how to properly care for them so that they will last as close to the full ten years as possible! No more dishwasher!

General Use:

  • Do not rush preheating process by using a high heat. Start with a medium heat and then adjust as needed.
  • Use nylon, plastic or wooden utensils only
  • Cookware may be used in the oven up to 400 F, but never in the broiler. (Check manufacturer's recommendations as not all cookware is made to sustain oven temperatures.)
  • Allow pan to cool thoroughly before washing. Never immerse a hot pan in cold water.
Cleaning:
  • Hand wash only. Never place cookware in a dishwasher. 
  • Never use abrasive cleaning pads or cleansers.
  • Clean the interior nonstick surface with a liquid dishwashing detergent and a nonabrasive sponge or soft bristle brush.
  • Clean the exterior (hard-anodized aluminum surface) with a liquid dishwashing detergent and a nonabrasive sponge. 
  • For stubborn spots on exterior, use Barkeeper's Friend cleanser and a nonabrasive sponge or soft bristle brush
Cookware should last at least 10 year if properly maintained. 


Cast Iron
    One of my favorite aspects of cast iron cookware is that is it more sustainable and naturally coated. It will last at least ten times longer than nonstick cookware when optimally maintained. Plus, it's neat to hear stories from family members of who owned each pan and the foods that were made in them. 
    My husband is well-versed in cast iron cooking and care. I, on the other hand, have had to learn through trial and error. My first cast iron cookware was a grill pan. I didn't know much about cast iron seasoning and so when I washed it after use I scrubbed and scrubbed. I thought it was a job well done to have removed all that coating. The shocked look on my husband's face said otherwise!
       I'm still not the best at keeping my pans in optimum shape for cast iron, but I've certainly come a long way! Getting into the habit of applying a thin layer of oil after each wash has improved their condition quite a bit. (I use coconut oil, but I know of family members who use bacon grease or shortening). 

General Use:
  • Hand wash only. Dry immediately. Rub lightly with oil of choice. 
  • Acidic foods like tomatoes, beans and certain sauces can damage seasoning, and should be avoided until the seasoning is well established.
Cleaning:
  • Avoid using the dishwasher, strong detergents and metal scouring pads as they can remove the seasoning
  • In many instances cookware can be wiped clean without the use of soap (cookware is 400 F in only 4 minutes while over medium heat and is considered sterile at 212 F). If soap is desired, then wash in mild soapy water. Dry and rub lightly rub with oil immediately. 
  • If food begins to stick significantly, the color becomes dull and gray, or rust forms, then reseason cookware. Thoroughly wash cookware in hot soapy water with a stiff brush. Rinse and dry completely. Apply a thin layer of oil to entire surface of pan. Place sheet of aluminum foil on bottom rack of oven to catch drips. Heat oven to 350-400 F. Place cookware upside down on upper rack. Allow to heat for approximately one hour. Turn oven off and allow pan to remain in oven until cool. If
Cookware should last at least 100 years if properly maintained.


Stainless Steel
     A set of high quality stainless steel cookware is in my opinion well worth the investment. I didn't come into having a nice set of cookware until marriage. I previously used a rather cheap set, which suited my needs at the time considering I didn't cook much and couldn't afford much. That set was quickly moved out when we married as he had a rather nice set of stainless steel cookware. Quality goes a long way, especially now that we cook quite a bit each day! 

General Use:
  • Do not allow foods with high chloride (ex. salt) or acidic (ex. tomatoes) contents to remain in cookware after use. (This can cause discoloration or pitting). If you add salt to the water when boiling pasta or vegetables, allow the water to come to a full boil before adding the salt.
  • Cookware is oven safe to 400 F (350 F with cookware lid). (Be sure to verify with the specific manufacturer of your cookware). 
  • Start with medium heat and then adjust as needed. Prolonged periods of high heat can discolor or damage pans.
  • Personal experience- don't let your beans boil dry in the pan. It is ridiculously hard to get clean again. Haha
Cleaning:
  • Cookware is dishwasher safe. However, handwashing is recommended to retain the original luster and shine. (Being the one type of cookware that can go in the dishwasher, I take advantage of this feature and skip the handwashing!)
  • Wash with warm water and mild soap. Use a soft sponge or nylon pad. Dry thoroughly. 
  • For stubborn stains, use a stainless steel cleaner such as Barkeeper's Friend
  • To remove baked on food, use a mild detergent in about one inch of water. Boil and then simmer in cookware for about 15 minutes. After cooling, drain, rinse and dry. 
  • Avoid soaking cookware in water for a long period of time, even if it's heavily soiled. (The chlorine and mineral content of the water, especially iron, can cause corrosion or discoloration). 

Monday, September 30, 2013

Homemade Applesauce


     Applesauce is so simple to make that it has dropped off my grocery list completely. Homemade applesauce is also much healthier than the store bought variety which contains high levels of sugars, including high fructose corn syrup. This post will focus on making homemade applesauce for serving, and a second post later will provide instructions for canning it for enjoyment during the off-season. 

While applesauce can be made with some spice like ginger or cinnamon, I prefer to keep mine fairly basic by letting the apples be the predominant flavor. Certain apples are naturally sweet, and so by selecting these varieties I can reduce the amount of sugar I need to add. A great chart for selecting apples can be found at Pick Your Own. When we have apples in the pantry, it's usually Galas which work well for sauce as well as eating. For my husband and I, I will use about 2-3 apples to make sauce. (The following instructions are for two servings, and so you may need to make adjustments to the quantity if you're serving more people). 

Peel and cut the apples into small pieces. The smaller the pieces the faster they will cook. 


Place in a pot and add about 1/4 c. of water. (The amount doesn't have to be precise. You're not boiling the apples like you would potatoes. The water is just to get the pieces cooking.)

Continue cooking until the pieces easily mash with a fork. For chunky applesauce, use a potato masher to blend. For smoother sauce, a Stick Hand Blender  is wonderful. (I rather like the chunks of apples, so I just get it mostly smooth.)


If you wanted to add sugar, cinnamon or any other flavors then add them now. Whether you add additional flavors or not, the final step is to simply chill and then serve. Enjoy!

Up Next: Canning Homemade Applesauce

Linked up at:


Wednesday, June 12, 2013

Handwashing vs. the Dishwasher (Part 1)


       Does handwashing dishes clean them as well as a dishwasher? Does a dishwasher cost more in terms of repairs and replacement or energy usage? There are a few areas such as cleanliness, cost, time and consistency that must be considered when determining which method of washing dishes is better. 

        Let's begin with cleanliness. According to Real Simple, a water temperature of 140° is necessary to kill bacteria. The hot water from the facet will not reach this temperature, and for a good reason- it would burn your skin. Based on water temperature, the dishwasher is superior at sanitizing dishes. However, bacteria can still be eliminated in the dishwater with the use of antibacterial dishsoap or a small amount of bleach. Each of these has a significant drawback, though. Bleach, for instance, poses significant health and environmental risk.   Antibacterial additives to soap has recently raised concerns as a contributing agent to a growing antibiotic-resistance in the environment. I do not use either of these substances in my dishwater. If a dirty dish has sat on the countertop or in the sink for a while which would promote bacterial growth, then I would use another method. For everyday meals, good ol' soap and water is sufficient to clean dishes in my opinion. 

        A second aspect in the dishwasher versus handwashing debate is the matter of cost. Both methods require some degree of cost. Handwashing dishes involves the expense of water usage multiple times a day. A dishwasher also requires the expense of water usage, as well as electricity usage and the cost of eventually needing to repair or replace the appliance.  With a price tag of about $300-500, the sudden expense of replacement can hit a family budget pretty hard. With regard to electricity use, an energy-efficient dishwasher uses only 1kwh of energy (source: Huffington Post). Lastly, the dishwasher uses less water than handwashing if the dishes have not been pre-washed prior to loading into the dishwasher. I have always thoroughly rinsed my dishes prior to loading them into the dishwasher because as a renter I haven't always been able to rely on the older dishwashers in the units. This practice, however, adds to the cost of using the dishwasher. 

      Convenience and time requirements are also a consideration. Automatic dishwasher have lessened the work and time required by domestic tasks. It would by far take more time and energy to wash every dish by hand after every meal. As wonderful as it is be alleviated of this demand, I also believe there is a great good than can come from not having a task completed for me. Great gains can be found in domestic work! For example, my grandmother once wisely told me that your more resourceful and appreciative of how you use your dishes to cook when you've had to spend time and effort bending over the sink to wash them. I find myself not as mindful and well..spoiled and lazy when it comes to caring for my possessions, including my kitchen dishes. 

      The last consideration is in regard to lifestyle. When I had a residence of my own prior to marriage, I would wash by hand because if not I'd run out of dishes before I could fill the dishwasher. Now, I cook full meals a few times a day and never lack in filling the dishwasher. Yet, I have a bad habit of leaving dishes for a later clean-up. By the time "later" arrives, I'm also needing to cook a meal but have little work space or cooking utensils. Or, someone drops by to visit and I'm too embarrassed of the mess to extend an invitation inside (our home has an open floor plan, so there's no avoiding the kitchen). I've discovered the best means of combating this bad habit of mine is to wash all the dishes after each meal. I tend to have so many dishes and cookware that are not dishwasher safe that I have to wash by hand even if I'm using the dishwasher. So, I decided to just wash everything by hand after each meal, and the kitchen stayed cleaner. (Of course, knives or cutting boards that dealt with meats or eggs were placed in the dishwasher anyways). Even though the dishwasher is more efficient, it's been more beneficial for me to develop better habits the old fashioned way. If you find yourself with piles of dirty dishes all the time, I suggest to begin washing by hand to: 1) develop a better mindfulness of your (over)usage during meal prep and 2) develop a better habit for keeping dishes caught up. In time, you can shift from the sink back to the dishwasher. 

Up Next: Part 2 (How to properly handwash dishes and load the dishwasher)


Friday, May 10, 2013

Selecting Background Noise For the Home


          Studies have shown background noise to have an affect on attitudes and behavior. In essence, the more active the sound the more activity generated within the mind and behavior. Similarly, calmer and more melodic the music generates less activity and promotes relaxation. Retailers and other places of business have long used this research in determining the type of music to be played. Trendy clothing retailers will likely prefer to play fast beat and high energy music to create a sense of excitement and even connect the shopper to a fashion runway setting. Doctors offices typically play classical or easy listening styles of music to calm anxiety that may be present in their patients. Places with a lot of visitors and commotion may also use classical music to ease the chaos. Selecting the type of music or background noise is critical but so is the level. Too much of a background noise produces the opposite affect. For instance, classical music produces a calm affect but not when played too loudly. Too little background noise results in individuals becoming uncomfortable and seeking to escape the silence. 

        The home environment is similar in demonstrating the affect background noise has on attitude and behavior. I've personally noticed that what I listen to even if only played in the background has an affect on my attitude, concentration and productivity. The absence of noise is uncomfortable as I am highly conditioned from the loud modern day life to expect some degree of input at all times. The simplest response is to turn on the television, movie, radio or log onto social media. However, those resources are rarely beneficial in moving me forward in life in a positive direction. They also have a tendency to turn into needless noise themselves.  

        Over time I've come to rely on a handful of sources for adding more favorable background noise to my home during the days. One of my favorite verses is Philippians 4:8 which states: "Finally brothers and sisters, whatever is true, whatever is noble, whatever is right, whatever is pure, whatever is lovely, whatever is admirable -- if anything is excellent or praiseworthy --think about such things." I know that for me I'm more likely to think in this manner if I have made an effort to put such content into my mind. The effort is not as much about blocking any and every poor influence, but to use greater discretion as to what will be primary. For me, and in my home, I desire for the noise to be uplifting and edifying while also spiritually and intellectually challenging.


     For the most part, I have my Pandora Praise & Worship station playing hymns. I'm not opposed to contemporary worship songs, and, in fact, I do enjoy many of them. However, I love a good hymn! Many more of those speak to my heart. At times throughout the day I find a moment or situation that brings a lyric to mind. How often I have sung "I need thee every hour!" A few favorites on my Pandora station include:
          Journey: A Praise Offering [album] by David Carnes
          Adoration: Solo Piano Hymns [album] by David Nevue
          Beginnings [album] by Fernando Ortega
          Hymns: A Place of Worship [album] by 4Him
          Greatest Hymns [album] by Selah

      One aspect of seemingly everything transitioning to an online presence is the ability to find great sermons and messages. My top favorites are Greg Pinkner from a program called Crossroads held at Fellowship Church in Tennessee and Andy Stanley of North Point Ministries in Georgia. I had the privilege of attending Crossroads while in college. I enjoyed that Pinkner had a very unforced sense of humor, and taught Bible-based lessons on a college level. Even though I'm no longer in college, I still tune in to his messages and they still challenge and convict me. I really enjoy reading the Bible and learning on matters of faith, and his messages support that endeavor. Andy Stanley's messages are, to me, of a similar strong foundation. He also mixes humor with more serious content. He has a great real-life application approach without turning into a self-motivation talk.

      It's been great to listen to messages and music online while doing the mundane household activities like dishes and laundry. I've also played them while working on long projects, especially sewing projects. I'm not opposed to non-Christian media, and frequently part take of them as well. The above mentioned sources are, however, my favorites for accomplishing the goals of providing calm and edification. I've found that in the noise of everyday life, there are means of issuing calm. Even greater is the ability to for spiritual growth in and praise to the Lord!


*Note: Reviving Homemaking is not affiliated with any of the sites, companies, products or individuals mentioned or included in the links, and was not asked to include or recommend them in this post. (I simply like what they have to offer!)

Wednesday, November 7, 2012

Meaning of Home

living room at morning
Source

            The boxes and furniture have been delivered to your new home and now set in a chaotic array in each room. In spite of the mess, I see the beauty of potential. My creative mind busily composes images of the arrangements, textiles, and unique pieces that will offer such comfort and attractiveness to these open spaces and blank walls before me. I eagerly wait to add the many touches that will help to transform the generic townhome unit into something much more special- our home.

            Yet, even with all these elements in place a certain depth will remain missing. I could have all the decorative elements and the utmost style in our home, but without the company of friends and family the space will remain empty. The essence of a thriving home is more than the materials that comprise it; it’s the people who join together within that space.

            This notion is not new, and is, in fact, a commonly shared piece of wisdom. However, to some degree “home” remains to have a negative connotation. Home is the place where we can take refuge from the outside world, it’s our coveted storage space for all our dearly held personal belongings, it’s the place we get “stuck” in when we have nowhere else to go or no one with whom to go out. And for some, home is filled with so many unsettling moments or people that associating it as a good in life can be a challenge. With so many poor definitions of “home” existing, creating it into something completely different may seem daunting. It’s not! Each new day is a new opportunity to believe in the potential of home. There is so much depth and meaningfulness that can be instill into our homes!

            My heart for our home is for it to be a place that not only brings comfort to my husband and I, but also to others. Similarly, our space and possessions can serve others just as well as they serve us. In her book Simple Secrets to a Beautiful Home: Creating a Place You and Your Family Will Love Emily Barnes says:

                        Welcome home! That’s what I want my life to say to everyone whose path crosses mine. I want to create an atmosphere of serenity and joy, of blessing and belonging, that embraces people (myself included) and draws them in—an atmosphere that makes them feel loved and special and cared for. (page. 9)

Does this welcome and service require a little more of us? Certainly! Is it worth it? Absolutely! A life and home without welcome and service are regrettably missing something that truly enriches life. It’s not always easy to practice hospitality, especially when it feels like a faded practice among others. Nonetheless, I believe in the beauty of opening the doors of my home to guests and will continue to strive to do so. Think of it this way- could we spare one night each month to invite a family to enjoy dinner, dessert or an activity together? That’s only twelve days out of three hundred sixty five. Sounds a little more possible, right?

            But what if our homes are not decorated exactly like we’d want, or we don’t have the right (or enough) pieces to serve or entertain many guests? Then, take a breath and refocus yourself on the people not the possessions. Your guests are there to spend time with you, not necessarily your things. In fact, when they are there don’t even mention what is not as you’d like or how you’d change it if you could. The true lacking in that case is not of a material matter but a personal one. What is it that makes a less than desirable place one you feel compelled to return to time and again? It’s the content and joyful spirit of the person within the home! Strive to be the kind of person who is so content and so delighted in the company of others that everything else is insignificant.

Finally, what if we viewed our homes belonging more to God than us? Would our possessiveness lessen? Would we be less likely to use it as our hole to hide in? I believe God has a plan for each of us and will provide us with means to achieve that purpose. It’s about Him and His glory! That perspective has really influenced my desires for the meaning of my home and the means by which to achieve it. So as I continue unpack boxes and then decorate our space, I know that even if everything doesn’t come together as I have envisioned God does have it all together still! 


*-*-*-*-*-*-*-*-*-*-*-*-*-*-*-*-*-*-*-*-*-*-*-*-*-*-*-*-*-*-*-*-*-*-*-*-*-*-*-*-*-*-*-*-*-*-*-*-*-*-*-*-*-*-*-*-*-*-


Monday, October 22, 2012

The Family Car


Image Source

What is the value of each individual owning a vehicle? I began to toss this question around more and more this year. When my vehicle is predominantly sitting parked in the parking lot, then its necessity and alternate use for it’s worth comes to be questioned. Yet, I also considered what owning my own car represented- wealth, status, convenience, and even entitlement. We do not live in an area with public transportation or biking paths, and so I wondered if it would even be feasible for us to downsize to sharing only one vehicle.

There was a time in which families did share one vehicle- the family car. All driving members of the family had to make arrangements necessary to accommodate the needs or wants for its use. What allowed one car to be sufficient then but not now? Perhaps it has to do with expectation. As vehicle ownership increased in time so did the expectation for such. The seeming norm now is for each driving member of a family to have his or her own vehicle. In fact, it is not unusual for sixteen or seventeen year olds to be provided a vehicle of his or her own (but not necessarily true ownership). There are certainly many, many other factors at play for the greater possession of vehicles now in comparison to previous times. Expectation is simply one.
          
      After much discussion my husband and I made the decision to sell one of our two cars.  We weighed the pros and cons to making this rather big decision, and the following were the factors that were considered:

Advantages:
  • ·         Avoid costly maintenance/repairs.
  • ·         Financial stability
  • ·         Decreased insurance payments, taxes/registration/tags
  • ·         Option to replace two older vehicles for one more reliable one
  • ·         Eliminates a "yours" and "mine" mentality within our marriage
  • ·         Humility

Disadvantages:
  • ·         Inconvenience
  • ·         Lack of transportation in the event of an emergency
  • ·         Immediacy of purchase if a two-income situation were to be needed
  • ·         Judgment for choosing to live differently

     Ultimately, the advantages outweighed the disadvantages. We’re still discussing whether we want to trade in the remaining car for a newer vehicle. After finally achieving no car payments and one less debt, I’m reluctant to rush back into another one. Even then, we’ll continue to be a one car family. It takes a little more planning and intentionally if just one of us needs the car. Sharing a car also takes compromise. All of these qualities are good characteristics to develop personally and in a marriage. Sharing a car is simply another means of doing so.

Everyone’s situation and needs for transportation are unique, and I will certainly not assume that what has been appropriate for me and my husband is the same for others. If you are considering downsizing to one car, however, then I hope to encourage you with my experience.


        -*-*-*-*-*-*-*-*-*-*-*-*-*-*-*-*-*-*-*-*-*-*-*-*-*-*-*-


Monday, September 10, 2012

Managing a Small Kitchen


      After having lived in and looked at many apartments, I've come to the conclusion that the designers must expect apartment dwellers to eat out instead of cook. The typical apartment kitchen is unreasonably small! My husband and I, however, spend a considerable amount of time in the kitchen preparing meals. For us, the first room we look at in a unit is the kitchen. Our requirements are that it must be open on at least two sides (closed on three results in a very hot environment with little ventilation) and enough counter top space to house our oversized stand mixer and microwave as well as provide adequate working space. As far as storage is concerned that is where we are more flexible by allowing creativity to make up for limitations. The following is a few ideas for how to manage in a small kitchen. If you're working with a larger space, then some of these ideas may not be appropriate for you.  As part of the Home Sweet Apartment Series, though, we're focusing solely on small kitchen solutions. 

1) Determine Your Most Necessary Tools
      There are an exaggerated number of kitchen gadgets and tools. Many of these items are single purpose and can be replace by a simple knife. When selecting kitchen tools, select items which will either be used a lot or can be used for multiple purposes. I recently determined that the inner basket of my salad spinner (an item we use weekly) doubles as a colander, thereby eliminating the need to have both of theses items. Another example is our mandolin that has multiple blades for multiple cutting purposes. I originally had a box grater and another smaller grater, but then decided that the mandolin could accomplish the same result. I now just have the one tool instead of three. Instead of a large drying rack, I simply spread a towel across the counter on which to set the clean dishes to dry.  As you work more and more in your kitchen you'll discover which tools are important for your cooking and which can be excluded. 
     Of the tools you do have, choose a collapsible option whenever possible. The ability of an item to collapse has become one of my favorite features. There are more and more items being produced with this space saving feature in mind. They may be a little pricier upfront, but not near as expensive as having to pay extra rent to have extra space just for storage. 
Collapsible Produce Keeper
                    
                              Collapsible Cake Carrier

Collapsible Prep Bowl Set

     Large 3-Compartment Eco Silicone Collapsible Lunch Box


2) Create Counter Top Space By Simply Clearing It Off
        Counter top space is so valuable! Not only does items left sitting out decrease your working space, but it also creates visual clutter causing your kitchen to look even smaller. Chose the items that you cannot move easily to store elsewhere (stand mixer, microwave etc) to leave out. There are also items like spice racks, utensil holder, knife block and canister sets that are typically seen on the counter tops. There are a couple of things to keep in mind when displaying these items. For instance, spices will remain fresher longer in cooler, darker spaces. The kitchen environment can be a sticky, greasy place and so utensils are ideally best kept covered. As far as canister sets go, there is usually not so great a kitchen space that pulling them out of a cabinet is too inconveniencing.  Nonetheless, if you use it often, like it a lot, or the other cook in your home enjoys it's place on the counter then select a couple of your most used items and limit the display to those.

3) Maximize Freezer Space With Storage Systems
         You can read more on my organization system for maximizing freezer space in a previous post, but I will try to offer a small bit of that again. I really enjoy having a wide variety of items in my freezer. I also enjoy not having to dig for it when I need it. One way that we make a small freezer work is that we don't have bulky boxes of prepared food to store. I freeze everything flat in measured serving portions in pint bags. Since there is only two of us in our family, each pint bag contains only two servings of meat, vegetable, soup etc. Because the bags are flat once frozen, then stack upright nicely in the two-tiered sliding basket  system. I simply grab the item I need when I need it and have no worries about digging or thawing too much. Items that don't store flat are kept in the middle with a shelving rack. Lastly, I turned off the automatic ice maker and removed the bucket in preference for much smaller ice trays.                                                                                              
                                       
4) Get Creative With Storage
         Our home canned items are stored on top of the cabinets. They are up and out of the way while still fittingly displayed. The cabinets on the opposite side store our empty canning jars. A word of caution for this storage solution is that cabinets can fall so be careful with putting too much weight up there. 
          You can also use the space on top of the refrigerator for storage. Choose more attractive displays than cereal boxes, though. We keep one of our produce bowls there and a decorative basket that is used to house extra placemats, aprons, and pot holders. 
          Lastly, kitchen items don't have to be kept entirely in the kitchen. If you have a dining room, then it's perfectly appropriate to use that space as well. A cubed storage shelf or bookshelf nicely decorated with your extra napkins, drinks, dry goods etc. is a great addition to the room. Plus, the top surface can be used to sit coffee or tea pots or as a service area for guests (snack bar, desert bar etc). If you're really squeezed for pantry space in the kitchen itself, then use a full size bookshelf unit and clear, labeled jars for your dry goods. The key to keeping it from looking cluttered is to make it a decorative display in addition to storage, and maintain a cohesive look between the items. 
Take advantage of open spaces like above your sink. I have a piece of elastic that I can string across to clip bags to dry, a verse or word of encouragement to read over as I wash dishes, or a recipe card to reference while cooking. When not needed, I can simply slip the line off the hooks on each side and place it out of sight. 
5) Limit Your Pantry
        Our pantry looks rather bare in comparison to some, but we have everything we need to prepare two to three full meals each day. We do this by limiting our pantry to the basics: sugars, flours, oats, cornmeal, grits/polenta, cornstarch, pastas ect. We buy mostly fresh foods, and then create from scratch anything else we need. The result is our entire pantry cummulatively fitting on about five small shelves (including spices). Since we cook a lot from scratch we don't limit ourselves in having a large selection of spices. We have a three tier shelf and two swivel shelves for all our spices.  The swivel shelves are fabulous because they utilize vertical space and swing out so that I have easy access to everything. The larger packaged items are stored on the tiered shelf to the left. 
       While we're discussing the pantry, I have really enjoyed having labeled containers for items I keep on hand at all times. They are uniform in size and easily stack which are so valuable in small spaces. Setting up a pantry with containers can be expensive, however. Keep in mind that you don't have to go out and buy every container for every item at once. In fact, it's wiser to wait a bit to learn what you use enough to keep and how much of it you will want to keep. There are actually a handful of items in my pantry that are on the waiting list for containers. It's okay to organize piece by piece, and when you're working through establishing steady financial ground this is precisely what you want to do. Add a piece when you can and in the meanwhile enjoy what's already there.     


Read Other Posts in the Home Sweet Apartment Series:
*Homemaking While Apartment Living: Part 1, Part 2
*Concepts For Small Space Living
*Floral Wreath Tutorial

Linked up at: A Mama's Story, The Alabaster Jar, Homestead Revival, The Better Mom, What Joy Is Mine, The Modes Mom Blog, Covered in Grace, Raising Arrows, Time-Warp Wife, Far Above Rubies, Thankful Homemaker, A Pause on the Path, Cornerstone Confessions, Women Living Well, A Wise Woman Builds Her Home, Deep Roots At Home, Raising Homemakers, We Are THAT Family


*Note:The product links and images above may contain affiliate links to Amazon.com. Reviving Homemaking is an affiliate of Amazon.com, and as such receives compensation for each purchase made through the links.  

        -*-*-*-*-*-*-*-*-*-*-*-*-*-*-*-*-*-*-*-*-*-*-*-*-*-*-*-


Related Posts Plugin for WordPress, Blogger...