Showing posts with label Homemade. Show all posts

Monday, September 30, 2013

Homemade Applesauce


     Applesauce is so simple to make that it has dropped off my grocery list completely. Homemade applesauce is also much healthier than the store bought variety which contains high levels of sugars, including high fructose corn syrup. This post will focus on making homemade applesauce for serving, and a second post later will provide instructions for canning it for enjoyment during the off-season. 

While applesauce can be made with some spice like ginger or cinnamon, I prefer to keep mine fairly basic by letting the apples be the predominant flavor. Certain apples are naturally sweet, and so by selecting these varieties I can reduce the amount of sugar I need to add. A great chart for selecting apples can be found at Pick Your Own. When we have apples in the pantry, it's usually Galas which work well for sauce as well as eating. For my husband and I, I will use about 2-3 apples to make sauce. (The following instructions are for two servings, and so you may need to make adjustments to the quantity if you're serving more people). 

Peel and cut the apples into small pieces. The smaller the pieces the faster they will cook. 


Place in a pot and add about 1/4 c. of water. (The amount doesn't have to be precise. You're not boiling the apples like you would potatoes. The water is just to get the pieces cooking.)

Continue cooking until the pieces easily mash with a fork. For chunky applesauce, use a potato masher to blend. For smoother sauce, a Stick Hand Blender  is wonderful. (I rather like the chunks of apples, so I just get it mostly smooth.)


If you wanted to add sugar, cinnamon or any other flavors then add them now. Whether you add additional flavors or not, the final step is to simply chill and then serve. Enjoy!

Up Next: Canning Homemade Applesauce

Linked up at:


Wednesday, September 26, 2012

Homemade Yogurt

       Yogurt is a staple in our home. We use it in snacks, smoothies, breakfast parfaits, and as an ingredient substitution. There are many nutritional benefits to eating yogurt. When comprised of only the two basic components of milk and yogurt starter, you’re getting the nutritional offering of the milk plus the good bacteria found in the yogurt. Yogurt purchased in the stores is often times loaded with preservatives and sugars. There is also the issue of purchasing and throwing away all those plastic cups. My husband and I have since learned how to make a large batch of yogurt for a fraction of the cost. We initially used a slow-cooker method. My slow-cooker tended to get hotter in certain places and would scorch the milk leaving a mess of the milk and pot. So, we moved on from this method to the stovetop method. It does take some time to make yogurt at home. It probably takes me an hour from start to putting it away to culture, but I’m not standing over the pot the entire time. Now, let me show you why it may be worth finding an hour each week:
Cost to Purchase Ingredients: $4.73
Milk: $3.39/gallon & Yogurt starter: $1.34/6oz

Per Batch Cost: $1.07
Milk: $0.85/quart
Yogurt starter: $0.22/oz/2T

Purchased Yogurt: $1.34/6oz container

Unit cost
Homemade: $0.03/oz
Purchased: $0.22/oz

     In summary, we make one quart of yogurt for $1.07! If we purchased the near equivalent in 6oz cups we would need to buy 5-6 packages (@$1.34 each) which would total $6.70-8.04! I don’t know about you, but that’s a big difference for my grocery budget!

     I've found that the key to regularly including certain homemade foods is to make them part of your weekly routine. Pick a day of the week and make a particular food item that day. Keeping granola, breads, and yogurt on hand is much easier when I make making those items a part of life instead of setting aside life to make them. For instance, my hubby makes all our breads for the week on Sundays (he is amazing  at making breads). Finding time to do yogurt is similar. 


Steps:
(Keep in mind we're making only a quart for just my husband and I for a week. If you have a larger family, then adjust the amounts to fit your needs)

You will need: quart jar with lid, thermometer, whisk, 2 pots, 1 qt. milk (whole milk works best), and 2 T plain yogurt with active cultures (we like Chobani brand best). 

The first order of business is to sterilize your jar and lid. Simply place your jar and lid in the larger pot with water and heat to a boil. Allow to boil for a bit and then remove to a towel to cool. 

Next, heat your milk. This step is essentially re-pasteurizing the milk to make sure the only bacteria present to culture are those found in the yogurt starter. Heat the milk to 185˚F, and then hold it here for about 5 minutes. Then, cool the milk to 115˚F.

Add 2 tablespoons of yogurt to your jar. Add 1/2 c. of milk to the jar. Gently shake or stir to combine.  Then, add the remaining milk. This two step process allows your yogurt cultures to slowly rise in temperature to be able to safely tolerate the high temperature of the milk, so don't skip on this step. 

Replace the water in the large pot with as much cold water necessary to bring the temperature of the water to between  
90-100˚F. Place the filled quart jar in the water until submerged.  Leave the pot in the oven with the oven light on overnight to culture, approximately 8-10 hours. 

The next day, you have a quart of cultured yogurt! If you would like you can strain the yogurt at this point to have thicker, Greek-style yogurt with leftover whey or you can leave it as is. Sometimes I strain mine and sometimes I don't. If I'm going to be making a batch of granola then I might strain it to have whey to soak the oats. 

Uses:
     We currently use yogurt in making breakfast parfaits, smoothies (freeze the yogurt in cubes for a better smoothie result), snacks (add a spoonful of fruit preserves or fresh fruit for flavors), and as a partial mayonnaise substitution. My husband detests mayo. so I use half mayo and half yogurt in any recipe that calls for mayo. 

     Using yogurt as a substitution is also a good way to make the grocery budget stretch as it's cost is usually much less than the ingredient it's replacing. You can actually use yogurt in specific proportions in place of butter, oil, sour cream, mayonnaise, cream cheese, and buttermilk! Chobani's website has a lovely infograph conversion table of these substitutions.

*Note: Reviving Homemaking is not an affiliate of Chobani and has not been asked or persuaded in anyway to promote this brand. It's simply a brand that I have been pleased with in my own experience, and therefore wish to share with others. 

Linked up at: 
 
        -*-*-*-*-*-*-*-*-*-*-*-*-*-*-*-*-*-*-*-*-*-*-*-*-*-*-*-


Tuesday, September 25, 2012

Adding Color to White-Walled Rooms


 There have been a couple of times during apartment living in which I've painted the walls (with permission from the complex). In college, I shared an apartment with two other girls and it was so fun painting the rooms colors we agreed upon for the main rooms and then our personal preferences for our bedrooms. At that time, I did a stripe pattern in my bedroom. I had light blue on the top, white in the middle and then brown at the bottom of the wall. My bedding was brown and the entire scheme livened up my small space. Later, I had an apartment of my own. Having the rooms painted helped the space to be comfortable and warm while it was just I that I lived there. Of course, in both situations the fun came to an end when faced with repainting. We did have a good time with friends who joined in the repainting effort though! I enjoyed the colored walls at the time, but I probably wouldn't do it again. Painting walls can be expensive and requires a lot of work! Instead, I've opted for adding color to my space through textiles.


       Textiles such as pillows, curtains, tablecloths and/or napkins, and bedding all serve an important role in setting the tone of a room. One simple change in the material used in any of these decorations instantly transforms a room. They add personality and character to your space that brings you comfort and gives your guests a better idea of who you are. As previously mentioned, one goal in decorating an apartment space is to diminish the innate temporary feeling of the unit to create a more permanent feel. Utilizing fabrics convey the idea that you've embraced the apartment space as your own. It's your home and you've worked to create it to be just that in environment.

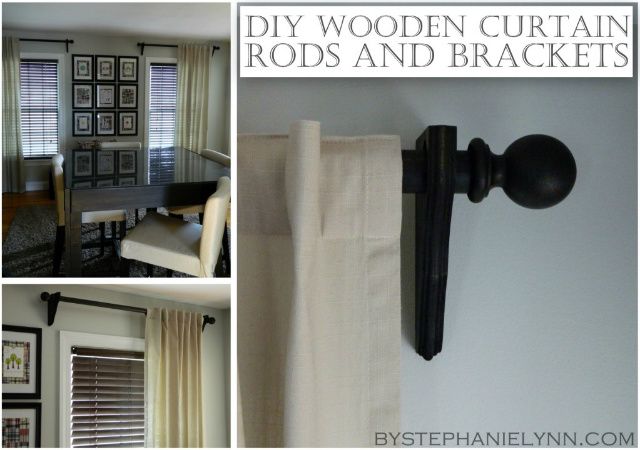
       Including these elements in your décor does not have to be overly expensive. In fact, if you're starting out in marriage and establishing your home environment then the décor budget may be tight. You may even need to work around pieces that were given to you. It isn't entirely necessary to purchase every item at one time. There are a couple of considerations when it comes to adding décor elements to an apartment. Unless you're planning on staying in one unit for years it's wise to take under consideration the flexibility of your selected pieces. For example, It would be quite the disappointment to invest heavily for curtains and rods, and then the next place have a different number of windows. Or, even worse is that the curtains and rods you previously invested in are no longer available to purchase, resulting in unmatched sets in the same room. One solution is to take a do-it-yourself approach. If you are unable to create the item yourself, then there are many sellers on sites like Etsy that can do it. Since they're making it they will likely be able to recreate it later if you need additional pieces. 

A few ideas:
Thomas_Paul_Fabric_curtain_rod_32
Visit House of Hepworths for this tutorial
Visit Under the Table and Dreaming by Stephanie Lynn for this tutorial.  
    
    Orange Dot Pillow CoverRed Pillow CoverCream Pillow Covers
               These pillow covers are available in the Reviving Homemaking Etsy shop

For many more ideas for decorating and organizing your small space, browse my Home Sweet Apartment Board on Pinterest. 

Read Other Posts in the Home Sweet Apartment Series:
*Homemaking While Apartment Living: Part 1, Part 2
*Concepts For Small Space Living
*Floral Wreath Tutorial
        -*-*-*-*-*-*-*-*-*-*-*-*-*-*-*-*-*-*-*-*-*-*-*-*-*-*-*-

Friday, August 31, 2012

Floral Wreath Tutorial

    Your front door is the first impression of your home and your personality. While some apartment buildings have uniquely styled exteriors, others are rather plain looking. Think about when you're looking at houses or being directed to a house. There are plenty of exterior elements in place to make it more appealing and to set it apart. I'm sure we've all been given the descriptions of "It's the house with (color) shutters" or something of the sort when given directions. An apartment can have that same effect! Your apartment is your home and it certainly doesn't have to be boring. Decorating the exterior gives it some excitement and helps guests easily find which unit is yours apart from all the other identical doors. Simply add a wreath to your door! Purchasing a pre-made wreath may be convenient, but it can also be rather pricey. A fun and affordable alternative is to create your own!
Materials can be shockingly expensive if not bought carefully.  I purchased all my supplies either on sale or with a 40% off coupon (available online) from Hobby Lobby. To make the wreath you will need:

- 2 main floral stems (I chose orange)
- 2 secondary stems of a contrasting color to add interest (I chose cream)
- Grapevine wreath
- floral wire
- wire cutters (I used a tiny pair I have for jewelry)
- (Optional) Bow or letter to place at bottom (not pictured above but included in later pictures)

 1. Cut stems into desired lengths. Lay out how you want the flowers to be arranged on the wreath before you begin. 
  2. Attaching the stems to the wreath by looping a piece of wire within the wreath and stem. Twist to secure in place. Cut the ends of the wire and tuck as much as possible out of sight. Aim to place the wires where leaves or flowers will easily hide them. If necessary, give them a little fluff to encourage them to do so. 
3. Add your secondary stems. Separate the pieces if desired and begin adding them throughout the main flowers. Attach in the same manner as was done previously. 

4. Optional- Attach a letter or bow to the center. I used the wire again, but you could also glue the letter to the wreath. 

The finished wreath! I really enjoy how it turned out and the fun it adds to the entrance of our unit. 

Read Other Posts in the Home Sweet Apartment Series:
*Homemaking While Apartment Living: Part 1, Part 2
*Concepts For Small Space Living

Linked up at: Homemaker By Choice, A Mama's Story, An Original Belle, The Alabaster Jar, The Better Mom, Covered in Grace, Raising Arrows, Time-Warp Wife, Far Above Rubies, Growing Home, A Pause on the Path, Cornerstone Confessions


        -*-*-*-*-*-*-*-*-*-*-*-*-*-*-*-*-*-*-*-*-*-*-*-*-*-*-*-

Sunday, June 24, 2012

Homemade Granola


     Store-bought boxed cereals generally are not my first choice for a breakfast meal. I do, however, enjoy cereals like granola with lots of yummy dried fruits and nuts. Though it can be purchased premade in the stores (at a rather high price), I prefer to make my own. It does take some time to prepare and then cook in the oven, but I find it well worth the energy. I have made granola using a slow cooker and oven, and prefer the oven. Since the oven has to be on (low) for several hours, I recommend cooking your batch in the early morning or late evening during warmer months to try to conserve some energy. During the cooler months, leave the oven door open once finished to fill your home with the delicious aroma and give your heating unit a break. If you're using a slow cooker instead, then you would simply turn it on low and stir on occasion until done. 
     Since regularly making our own yogurt, I've begun to use some of the whey that is left from the process to soak the oats. It isn't a mandatory step by any means. It's just a way to use the whey and infuse a little more nutrition. You can certainly skip this step all together if you wish. 
      I typically make enough granola to have about two quart + a pint jars, which will last my husband and I about a month since we don't eat it every day. Beyond a quick cereal breakfast, we also enjoy it as a topping for yogurt parfait snacks. 


Homemade Granola:
2 c. old-fashioned oats
2 c. multi-grain hot cereal mix (4-Grain , 7 Grain, 10 Grain Hot Cereal etc)
1/4 c. + 2 Tbsp. coconut oil, melted
1/4 c. butter, melted
1 c. water
1/4-3/4 c. whey  (optional) 
1/4 c. honey 
2 Tbsp. maple syrup
1/2 tsp. salt
1 tsp. cinnamon
1 tsp. vanilla extract
1/4 c. almond pieces/slices
1/4 c. pecan pieces
1/4 c. pumpkin (unsalted) seeds
1/4 c. dried mixed berries
1/4 c. raisins


1a. Optional soaking method: Mix oats and grains with butter, coconut oil, water and whey until all is moistened. Cover and place in refrigerator to soak for 12-24hours. Afterwards, stir together in a pot the honey, syrup, salt, cinnamon and vanilla. Simmer until thinned. Preheat oven to 200 °F.

1b. No soak method:  Stir together all wet ingredients (oil, butter, water, honey, syrup, vanilla) and spices (salt & cinnamon) in a pot until honey is thinned. Preheat oven to 200 °F. 


2.  Add honey and oat mixtures. Spread onto two-three baking sheets.


3. Bake for approximately four hours. Stir granola around a bit halfway through. The oats will continue to crisp when cooling.


4. Add nuts, seeds, berries and raisins. 


5. Store in sealed containers. 


Adapted from: Passionate Homemaking


Additional Resources:
10 Granola Recipes
14 Ways to Use Granola
Gifting With Granola


*Note: Some of the products listed above contain affiliate links to Amazon.com. Reviving Homemaking is an affiliate of Amazon.com, and as such receives compensation for each purchase made through the links. (Thank you!).


Linked up at: Time-Warp Wife, Growing Home, Far Above Rubies, A Pause on the Path, Beauty and Bedlam, Cornerstone Confessions, Women Living Well, A Mother's Heritage, Deep Roots at Home, Frugally Sustainable, Raising Homemakers, We Are THAT Family, Passionate and Creative Homemaking, Feminine Adventures, Little Natural Cottage, Our Simple Country Life, Raising Might Arrows, Consider the Lilies, Comfy in the Kitchen, Your Thriving Family, 1-Minute Bible Love Notes


-*-*-*-*-*-*-*-*-*-*-*-*-*-*-*-*-*-*-*-*-*-*-*-*-*-*-*-


Monday, May 14, 2012

Homemade Liquid Handsoap

      I've found that one of the greatest ways of making homemaking work with only one income in a two income world is to develop the knowledge and skill of making food or household items myself. Recently, when the handsoap in our home ran out I searched for an alternative to having to purchase it from the store. The less items I'm dependent on the store for managing our home, the better. When I did a cost comparison between the store refill bottle and the homemade version, the difference was laughable. See for yourself:

Store
56oz refill bottle (large store brand soap, nothing special) = $3.88, which is $0.069/oz

Homemade
1 gallon (128oz) = $1.18, which is $0.0092/oz!
           
      The supplies necessary to make homemade handsoap are simple and with some smart purchasing they're really inexpensive. I purchased the glycerin in an 8oz bottle from a local craft store and used an online 40% off coupon. So, it's cost was only $2.08, which is $0.26/oz. The soap was $3.72 for eight bars, which is $0.46/bar. With a total unit cost so low I could even go for the fancier soaps if I wished and still have a better value than purchasing it pre-made! I already had the fragrance, but if I hadn't I would've also used another 40% off coupon or waiting until it went on sale. Buying in larger quantities or using coupons/sales is a smart way to trim cost for homemade or DIY projects.

      The recipe isn't my own, but was found at The Farmer's Nest. Consequently, I'll offer the steps to the process but refer you to the original site for specific quantities. The original recipe doesn't include a fragrance and I didn't use any in my batch since my soap was scented. However, if you wanted to use an unscented soap and add your own fragrance, then I'd recommend adding it drop-wise and determining incrementally the amount you'd prefer. 


1. Supplies: Large stock pot, empty gallon jug or other container, glycerin, bar soap (x2), essential oil fragrance (optional) and dispensers. 

2. Grate soap bars.

3. Melt soap bits in a gallon of water on the stove. Add glycerin. 

4. Allow to sit until cooled (approx. 10-12 hours). It will be thick when complete, and so use a mixer or whisk to combine until a smooth consistency. 

5. Pour into container. 

6. Finished! A gallon of handsoap for less than a penny!

*-*-*-*-*-*-*-*-*-*-*-*-*-*-*-*-*-*-*-*-*

Related Posts Plugin for WordPress, Blogger...